Monday, May 4, 2015

Practicum Observance from April 23rd, 2015


Today my partner and I went to Bloomer High School for our last practicum observance, and while it was a great relief to have our 
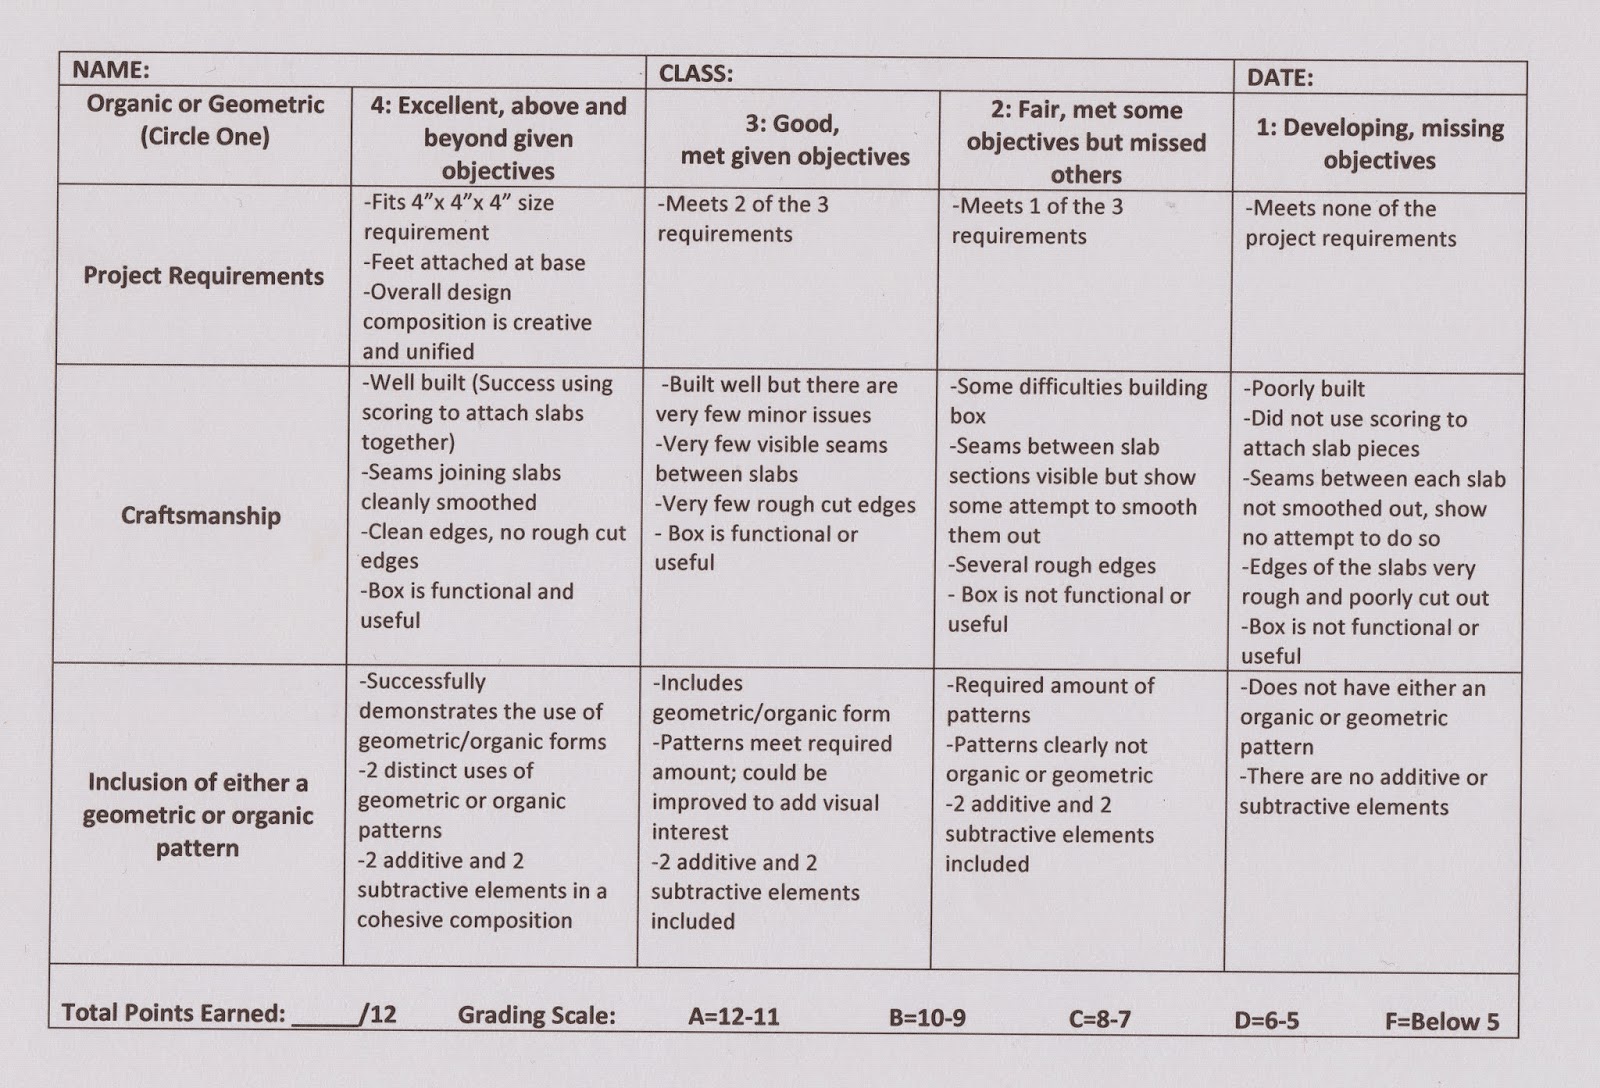
observance hours completed, it was also bittersweet.  For our Pottery I/II class, we had students 
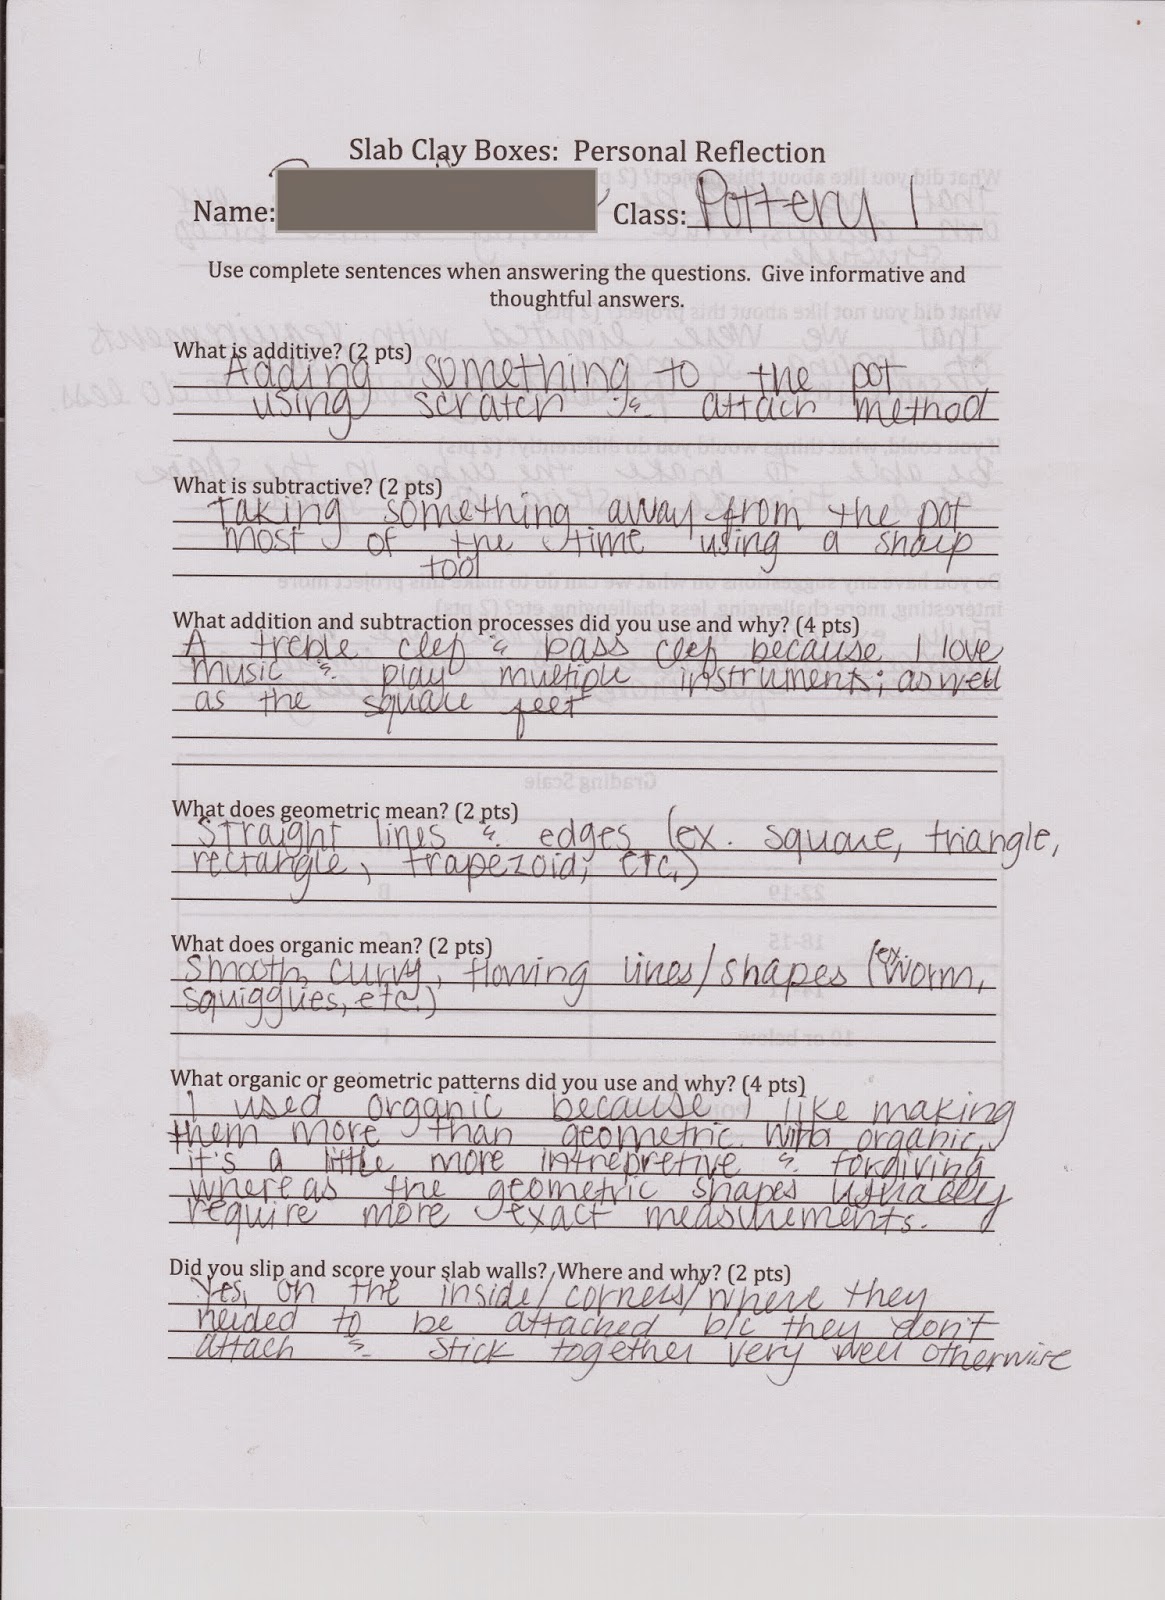
fill out a reflection worksheet, which asked them what they have learned as well as asking them personal feelings towards the assignment.  Here is one example of a student’s reaction to the assignment:


While my partner and I might have chosen a lesson that was a bit ambitious to tackle in three days, the end results were successful.  Over 90 percent of the class followed the objectives given to them and were beautifully executed!  Here are some examples of the students' work:


I cannot even begin to describe how much of a learning experience I received going through practicum.  Perhaps the best piece of information I learned from this experience was how to work with high school students.  High school can be a challenge for both students and for teachers to teach, especially at the high school level, where in most school districts, art is no longer required for students to take after eighth grade.  Many students at this age level approach art with an impassive attitude and feel that it will be an "Easy A" class.  Throughout my observation, I could see that many of the students enrolled in in the art classes had this attitude and it showed in their work.  One student in the Pottery I/II class openly admitted to me that she thought that this was going to be an easy class, and it was a lot more difficult than she thought it would be.  One thing I wish I could go back and change was how quickly I learned about the students.  As an introverted person, I tend to take a while getting to know others, and I wish I went in head first right away getting to know them.  By the time I got to know the students, our practicum experience was almost over with.  I can only take this experience and improve on it by being more willing to ask my students about them in order to both create a rapport with them and to create a curriculum that openly engages my students.  Another thing I learned from this experience that I will carry on throughout my teaching career is that it is okay to make mistakes and it is okay to not have a successful lesson.  In this case, one can only take the information from this experience and make adjustments and improvements to make the lesson successful and a positive experience for both the teacher and the students.      


Slab Clay Box Lesson: April 14th-16th (Days 1-3)


Day 1:   

Today was the first day of teaching our clay slab box lesson, and to be honest, it was a little rough simply because I was unsure what exactly to expect.  To begin the lesson, we introduced the students to the assignment with a Microsoft PowerPoint presentation and we tried to actively engage students by asking students about their prior knowledge of working with slab.  Unfortunately, many of the students were unwilling to answer questions that were asked of them and only a select few would answer questions, which is counterproductive of an engaged classroom dialogue, which was our original intent.  For students to gain some inspiration, we included examples of slab boxes made by artists.  We then asked students to compare and contrast the examples and talk about why one included organic forms and the other included geometric forms, and vice versa.  Students were then given the grading rubric and we went over each of the criteria and how to achieve the best possible grade.

   *This is a copy of the grading rubric that was given to the students*

After the introduction, the students were given a demonstration on how to construct their slab pieces and students were given a template of the square pieces needed, for time’s sake.  Students soon got to work to cut out their slab squares and before we knew it, the class period was over.  After the students cleaned up and left, our cooperating teacher went over what we did with us and gave us a lot of constructive criticism.  I was honestly very worried at what our cooperating teacher was going to say, but after hearing her input, it put me at ease. 

 
*The three pictures above are of our cooperating teacher's of the first day of our lesson*

Day 2:   

Today ran a little more smoothly now that we had an idea of what to anticipate because of the information that our cooperating teacher gave us from the previous day.  Before the students began working on their boxes, my practicum partner gave the students a demonstration on how to cut the lid to their box off of the hollow cube.  After the lid was cut off, she demonstrated how to create a flange on the inside of the lid.  A flange is a protruding edge that can be used to strengthen an object, which in this case, the lid, as well as having the ability to keep the lid placed on the box.  Putting a flange on a clay form was a new concept that the students needed to learn, so we made sure to thoroughly explain it and demonstrate it to the students.  

After the demonstration, the students set to work on their clay boxes.  During this time, Emma and I went around the class and helped students with any technical issues.  We also took advantage of this time by asking students what they have learned so far as we were helping students.  We used this information as an informal assessment in order to determine what information needs to be touched on.     


Day 3:   

Today we had students continue working on their clay boxes and perhaps the most serious issue that students are coming across is that they are not letting their clay slabs dry enough to become leather hard.  Because of this, when they attach their slabs together to make the cube form, the walls are having difficulties supporting the weight and are bulging outwards.  Another issue some students are having is that despite my partner telling students several times throughout the course of our lesson, they are not properly covering their clay slabs and the slabs have tried out too much in order to be leather hard.  In order to attach the slabs to each other using scoring and slip, the slabs need to be in the leather hard stage.  Because of these difficulties the students are having, we gave the students an extension in order to complete the projects successfully and correctly.  There were some students who were having success with building the cube form and in many cases helped their friends who were having issues.    

Halfway through the class period, we had the students gather around the table to give a demonstration on how to apply additive and subtractive textures to the surface of their boxes, in which I applied a clay shape resembling an ocean wave, which was my additive piece.  I then added more texture by carving out curves on the wave, which gave the piece a sense of movement while also being a subtractive quality.  After demonstrating the additive and subtractive processes, I demonstrated how to attach the feet we had students make the day before using scoring and slip.  I made sure that the students remembered the information I was giving them by asking them what I had done previously.  The students confidently answered the questions I asked of them and after asking if there were any further questions, I dismissed the students and they went back to working on their boxes. 

Unfortunately because of the technical issues that the students were facing with their slab pieces, my partner and I decided to extent the lesson and gave the students more time to complete the assignment.   


Practicum Observance from April 2nd, 2015


Today the students in Stain Glass were working on a new assignment with which they were given free reign of what subject matter to include into the piece, as long as it fit into the large size requirement.  My partner and I went over the worksheets that our cooperating teacher uses to assess the students’ assignments, and in this case, the Frank Lloyd Wright/De Stijl windowpane assignment.  The worksheet lists several questions, such as, “Did you have any bubbles under the copper tape?”  To the right of the questions, there were 2 columns with blank spaces where in one column, the students would grade themselves, and in the other the teacher would grade them.  Also included in the worksheet were short answer questions with questions such as, “Which style did you choose and why,” and “What are some key features that are associated with the style you chose?”  Our cooperating teacher would insert comments in places where the answer might not be clear or made suggestions to what the student could have done to receive a better grade for each question.  I personally liked this style of assessment because it includes the student into the assessment and allows the opportunity to defend their work.  We asked our cooperating teacher why she decided to do assessments such as this and said that she did this type of assessment for the exact same reasons why I liked it. 

During Drawing and Painting I/II, the students had a critique for their self-portrait paintings.  The students gathered in the cafeteria and presented their paintings one at a time.  The students were asked to say what artist they mimicked, what element of art they focused on, and a characteristic that is associated with the student.  Many times the student could not remember what element of art they used, so our cooperating teacher had worksheets passed out with the elements of art defined on them.  There were also a few students who did not pronounce the artist’s name correctly.  These issues really worry me because it makes me wonder if the students have actually learned and retained the information or it could simply be a case that this group of students is nervous to speak about their work in front of others.  I have noticed that many of the students are overly critical of their own work and will often just accept mediocrity, which just breaks my heart.  One thing I wished that our cooperating teacher would have had the students do during the critique was to have students make comments on their peers’ works and make suggestions for their peers on what they could do to improve their work.

In Pottery I/II, the students are learning about and working on making slip castings.  The assignment requires them to make 2 casts of the same mold, where one is altered and the other unaltered.  There were a few students working on the potter’s wheel where my partner and I helped those students with such things as centering their clay on the wheel and learning how to pull the walls of the bowl upwards.  It was a little difficult for me because I am left-handed and the wheels spin counter-clockwise, which is the direction you want the wheel to be spinning if you are right-handed.      

Practicum Observance From March 26th, 2015


Today was Emma and I’s second day of practicum observance and now that we knew what to expect going into the classroom, I wasn’t as nervous about observing the students. 


The Stain Glass I/II students continue to work on their stain glass pieces that they were working on during our first observance day.  Most of the students have moved on to a new assignment where they are creating a hanging windowpane in the style of either Frank Lloyd Wright or De Stijl.  Coincidentally, I am currently studying Frank Lloyd Wright and De Stijl in my History of Design class, so I was pretty proficient on the knowledge of both subjects.  Because of this information, I was able to help some of the students gain a better understanding of both Frank Lloyd Wright and De Stijl. 


In Painting and Drawing I/II, the students were introduced Mark Rothko and Abstract Expressionism.  The students also had a review of color theory and they had a discussion of how colors can convey emotion.  To give students an example, they were played a sample of Taylor Swift’s song “Red”.  The lyrics go as such:


Losing him was blue like I'd never known
Missing him was dark grey all alone
Forgetting him was like trying to know somebody you never met
But loving him was red
Loving him was red


I thought the incorporation of the song into the lesson helped students engage with the information presented as well as learn about how aspects of art, such as color, can be an aesthetic experience.  I believe that I could teach students about aesthetics by doing an activity such as this because it engages the students by incorporating their interests.  After the song activity, the students were shown examples of Mark Rothko’s work and the students were asked what kinds of emotions they felt looking at his work.  I have recently studied Mark Rothko’s work in my Art Since 1950 class, and we did a similar activity while looking at his paintings.  Rothko wanted the colors in his paintings to immerse the viewer in order to evoke an emotion from the viewer.  Because of this choice by the artist, he never titled his paintings except for the colors that he used in each composition.


The students were then given a demonstration on how to execute the project.  Our cooperating teacher had made 6 batches of wallpaper paste, which was dyed to the colors in the color wheel.  Then the students were shown many ways on how to apply the wallpaper paste onto a giant sheet of paper except for a paintbrush.  For this assignment, the students were not allowed to use a paintbrush, so Mrs. Gumness had several types of materials and tools that the students could use to apply the paste.  The students were asked to think of an emotion they have experienced and they were to convey that emotion onto the painting surface.  The results of this lesson were very exciting to watch come to fruition because each and every one of the student’s applied the wallpaper paste in a different way. 


In Pottery I/II, the students were now working on coil and creating bowls made from coil.  A few of the students were a little behind and still working on their pinch pots.   For all the classes Mrs. Gumness teaches, they are given a list of all the assignments that they will be doing over the course of the trimester along with due dates for each project.  For the advanced students, they are given this list as well, but they have the freedom of getting ahead if they finish an assignment early.  There are some aspects of this way of teaching I like, especially at the high school level.  One reason I like it is because it can give the students a sense of responsibility with making sure that their assignments are completed, but there will always be a few students that will take advantage of that freedom and will wait until the last minute to finish the assignments; in the end, the end product(s) tend to be not the best quality and don’t accurately show the students’ ability.  I took advanced art classes my senior year of high school and my teacher approached the class the same way; we were given a syllabus with due dates and that was the extent of our teaching.  At least with Mrs. Gumness’s teaching style, she is actively engaging with them and giving advice and helping her students proactively.    


Another question we asked our cooperating teacher was how she defined the rules of her classroom.  She closely follows the school’s motto, “Be respectful, Be responsible, Be safe… It’s the Blackhawk way!” which is posted next to the door to the hallway.  Along with following the school’s motto, she also has rules in regards to language use.  If a student says a profanity, she expects the students to say 3 positive words starting with the letter the profanity started with.  Another way the cooperating teacher manages her class is at the beginning of the trimester, she has students sign a contract stating that they will respect the rules, the materials being used, their peers, and safety procedures in the classroom.  The cooperating teacher also implements a checkout system for art supplies, such as paintbrushes, pencils, and digital cameras.  As stated in the contract, the student will check out a supply and the object is supposed to be returned in the same state it was checked out in.  If a supply is returned in poor shape or not returned at all, the student is expected to pay the cost of replacing that object.  I believe that this is a fantastic classroom rule, especially at the high school level because it holds the students accountable as well as teaching them responsibility.   
   

Practicum Observance from March 12th, 2015


Today was my partner and I’s first day of Practicum observance.  While I was a little nervous today, I feel that it was very beneficial for us to have met with our cooperating teacher prior to observing the classroom.  Our practicum observance is located in a rural community with several farms surrounding the outskirts of town and many of the students live on these farms.  Our cooperating teacher allows the students to listen to music while they are working, and the entire time we were there, the students listened to country music.  Over the course of our Practicum observance, we will be observing 3 classes from 8am-12 noon; Stain Glass I/II, Painting and Drawing I/II, and Pottery I/II.   

Many times our cooperating teacher will teach more than one class at a time.  In my opinion, I do not think I could do that because I feel that I would be an ineffective teacher and it would only hurt my students in the long run.  I wonder how this style of teaching affects these specific students?  Observing the students walking into class, many of them seem to walk in with an impassive attitude, as if they are only in this class because they needed to fill in an open spot on their schedule.  Other students enter class with a positive attitude and look happy to be here.  As the bell rang, the students gathered their supplies and current projects and our cooperating teacher gathered the students' attention by projecting her voice for all the students to hear.  There doesn't appear to be a specific procedure for gaining the students' attention.  Our cooperating teacher has the curriculum for each class posted in several areas throughout the classroom, which includes each project that will be completed with due dates posted.    


First period is Stain Glass I/II.  Students who have never taken the class are first introduced to stain glass by creating a small light catcher that is based off a pattern with which they trace the shapes onto the desired colored glass and then they cut it out with glasscutters.  The edges on each shape are then wrapped in copper tape and are rubbed on flat to avoid bubbles under the tape.  After every piece is wrapped in copper, they are soldered together and then the students have their end result.  Neither my partner nor I have ever taken a stain glass class, so we felt pretty useless during this class period.  We asked the students questions on what they were doing and the reasons why they were doing each step, and they were more than willing to answer our questions.  We knew that our cooperating teacher was an alumnus of the school we are currently attending, where there is no stain glass classes provided, so we asked her where she learned how to teach stain glass.  She told us that she learned from the former art teacher before she retired as well as a few students that she had in her Stain Glass II class during the first year of her teaching career.  I hope to be able to take this new-found knowledge into consideration when I begin teaching, in the possible case of having to teach a medium that I am not familiar with. 


Second period is Painting and Drawing I/II.  Currently the students are working on self-portraits on canvas board, in which they have to paint their portrait in the style of an artist of their choice.  The students were given a list of artists and were assigned to make a report on the artist they chose.  As I was walking around observing what the students were painting and trying to figure out what artists they chose, I noticed that a significant portion of the class chose to paint in the style of Pablo Picasso.  One adjustment I would have made to how the students chose the artists was to only allow a certain amount of students to choose each artist.  To do this, I would have created a sign-up sheet with all the artists’ names with 2-3 name slots for students to sign up for, so in this case it would be a first-come, first-serve method.  I believe this would be a successful way to have the class explore and discover a wide variety of artists as well as challenging the students in learning new painting techniques without taking the easy way out. 


Third period is Pottery I/II.  There are 26 students in this class and three of them have IEPs.  These students are helped out in the classroom by a paraprofessional, but she tends to focus on one specific student who is blind.  The other two students are for the most part self-sufficient, but once in a while need a little extra help.  There are 18 girls in the class and 8 boys, so it is clearly a female-dominated class.  Currently the students are working on pinch pots and over the course of the trimester will complete projects in coil, slip casting, slab, and on the potter’s wheel.  I believe that the way our cooperating teacher has the curriculum planned out is very logical and sequential in regards to learning the many techniques that can be used in pottery.  


When we met with our cooperating teacher a week before, we asked her several questions regarding teaching art.  Our first question was why she decided to teach art.  For years, our cooperating teacher worked for Menards working in their advertisement department, creating the weekly ads for the hardware store.  Eventually she was pushed out by younger competition and decided at that point to pursue her real dream of teaching art.  She told us that she has always loved art and wanted to help others pursue their love for art.  While she was an older student in college, she was able to complete her degree in three years and was able to teach at the high school where she graduated years before.  She also stated that by teaching art, she feels that she can give back to the community she grew up in.